DIY Load Bearing Wall Removal: A Comprehensive Guide
Embarking on a do-it-yourself (DIY) journey to remove a load-bearing wall can be both rewarding and challenging.
In this guide, we’ll walk you through essential DIY tips for assessing load-bearing walls, common mistakes to avoid during the removal process, and the tools you’ll need for a successful DIY load-bearing wall removal project.
LAST UPDATED: JUNE 26, 2024
DIY Tips for Assessing Load Bearing Walls:
Undertaking a DIY assessment of load-bearing walls is the initial and crucial step in planning a successful removal project. Here are practical tips to guide you through this process:
1. Visual Inspection:
-
Purpose: Begin your assessment with a visual inspection of your property.
-
Key Points:
-
Look for walls positioned centrally in the house or aligned with the exterior walls.
-
These walls often carry the weight of the structure and are likely load-bearing.
-
2. Blueprint Analysis:
-
Purpose: If available, analyse blueprints to understand the structural elements.
-
Key Points:
-
Focus on sections indicating load-bearing walls or key structural features.
-
Seek guidance from professionals if certain aspects are unclear.
-
3. Professional Input:
-
Purpose: Consider consulting with a structural engineer for expert advice.
-
Key Points:
-
Engineers can provide insights into potential challenges and structural considerations.
-
Their expertise ensures a more accurate assessment.
-
4. Load Distribution Analysis:
-
Purpose: Assess the load distribution in your building to understand the wall’s impact.
-
Key Points:
-
Learn basic load distribution principles for a preliminary understanding.
-
Evaluate how the load-bearing wall contributes to overall stability.
-
**By following these DIY tips, you’ll gain valuable insights into the nature of load-bearing walls in your home, laying the groundwork for a well-informed removal plan.
Common Mistakes to Avoid in DIY Wall Removal:
While the prospect of a DIY load-bearing wall removal project is exciting, certain common mistakes can compromise both the safety and success of the endeavor. Here’s a guide on what to avoid:
1. Lack of Professional Assessment:
-
Mistake to Avoid: Proceeding without a professional assessment of the load-bearing wall.
-
Key Points:
-
Professional insights can prevent critical structural mistakes.
-
An expert opinion ensures the project aligns with safety standards.
-
2. Insufficient Support Structures:
-
Mistake to Avoid: Starting the removal without proper installation of temporary supports.
-
Key Points:
-
Inadequate support structures can lead to safety hazards and structural damage.
-
Ensure temporary supports are robust and strategically placed.
-
3. Ignoring Building Regulations:
-
Mistake to Avoid: Neglecting local building regulations and permit requirements.
-
Key Points:
-
Familiarise yourself with regulations to avoid legal consequences.
-
Obtain necessary permits before initiating any removal work.
-
4. Overlooking Electrical and Plumbing:
-
Mistake to Avoid: Starting the removal process without rerouting electrical wiring and plumbing.
-
Key Points:
-
Neglecting this step can lead to complications, additional costs, and potential safety hazards.
-
Ensure proper relocation of utilities before any demolition work.
-
**Avoiding these common mistakes is pivotal to the success and safety of your DIY load-bearing wall removal project. Learn from the experiences of others to ensure a smoother and more effective renovation journey.
Tools Needed for DIY Load Bearing Wall Removal:
Equipping yourself with the right tools is essential for a successful and safe DIY load-bearing wall removal project. Here’s a comprehensive list of tools you’ll need:
1. Stud Finder:
-
Purpose: Use a stud finder to locate studs and understand the wall structure.
-
Key Points:
-
This tool helps identify load-bearing elements within the wall.
-
Ensure precise placement of support structures.
-

2. Circular Saw:
-
Purpose: Employ a circular saw for controlled cutting during demolition.
-
Key Points:
-
Ensures accurate and efficient removal of sections of the wall.
-
Ideal for making precise cuts while minimising damage.
-
3. Sledgehammer:
-
Purpose: A sledgehammer is effective for initial demolition and breaking down the wall.
-
Key Points:
-
Provides the force needed for the early stages of removal.
-
Use with caution to avoid excessive damage.
-
4. Acrow Props and Strongboys (if need it):
-
Purpose: Acrow Props and strongboys provide adjustable support during the removal.
-
Key Points:
-
These are versatile tools that support the structure above the area being worked on.
-
Particularly useful for supporting beams or other structures temporarily.
-
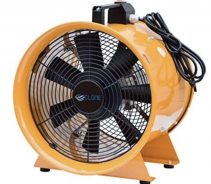
5. Dust Extractor:
-
Purpose: A dust extractor helps maintain a cleaner and safer work environment.
-
Key Points:
-
Reduces airborne dust particles generated during the demolition process.
-
Enhances visibility and minimizes respiratory risks for a safer work area.
-
6. Protective Gear:
-
Purpose: Wear safety glasses, gloves, dust mask and a hard hat for personal safety.
-
Key Points:
-
Protect yourself from potential hazards during the demolition.
-
Safety gear is essential when working in a construction or demolition environment.
-
**Equipping yourself with these tools, including Acrows (Strongboys) and a dust extractor, ensures that you’re well-prepared for the challenges of a DIY load-bearing wall removal.
Prioritise safety, precision, and a clean working environment to achieve the desired results.
